Working Advice
- Pull the plug out of the socket before carrying out any work on the power tool.
- Always wait until the power tool has come to a complete stop before placing it down.
- Do not put the power tool down on its side. This could permanently warp the sanding pad.
- This power tool is not suitable for bench-mounted use. It must not be clamped into a vice or fastened to a workbench, for example.
Switch the power tool on, place the entire sanding surface against the surface of the workpiece and apply moderate pressure as you move the sander over the workpiece.
The material removal rate and sanding result are primarily determined by the choice of sanding sheet, the preselected speed setting and the contact pressure.
Only immaculate sanding sheets achieve good sanding performance and make the power tool last longer.
Be sure to apply consistent contact pressure in order to increase the lifetime of the sanding sheets.
Excessively increasing the contact pressure will not lead to increased sanding performance, rather it will cause more severe wear of the power tool and of the sanding sheet.
Do not use a sanding sheet for other materials after it has been used to work on metal.
Use only original Bosch-sanding accessories.
Thanks to the removable brush segment, you can reduce the lateral distance between the wall/ceiling and the sanding pad.
- Press and hold the locking mechanism (11) for the brush segment (17).
- Swivel the brush segment (17) forwards and remove it.
- To insert, hook the brush segment (17) onto the opposite side of the locking mechanism (11), and swivel it towards the sanding head (10) until it clicks into place.
Depending on the vacuum pressure, the perceived tool weight can be reduced.
You can switch between different air flow operating modes depending on the intended use. Turn the suction power adjusting lever (12) to one of the 3 positions.
Switch position | Type of airflow | Use |
|---|---|---|
| ① External airflow | Ideal for sanding walls at high sanding speeds and without vacuum pressure |
| ② Mixed external and internal airflow | Medium sanding performance with vacuum pressure effect |
| ③ Mixed external and internal airflow | Ideal for sanding ceilings at low sanding speeds but with high vacuum pressure (suction power) for a low perceived weight |
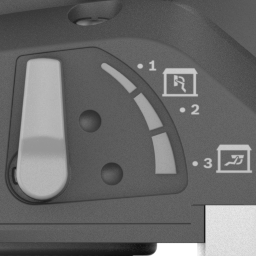

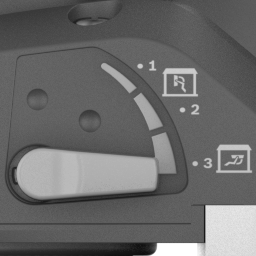
You can adjust the suction power to achieve your preferred balance between sanding speed and suction power. This regulation is only possible when the internal airflow is activated (position ③ in the table above).
Adjust the suction power with the thumbwheel (1):
- 1−5: Low to high suction power, suitable for sanding ceilings
- 6: Highest suction power, suitable for sanding walls
Start with a low suction power (position 1) and increase slowly, until there is a noticeable contact pressure.
High suction power allows low-fatigue sanding of ceilings and walls. An excessively high suction power can cause the power tool to vibrate, which can make handling more difficult.